|

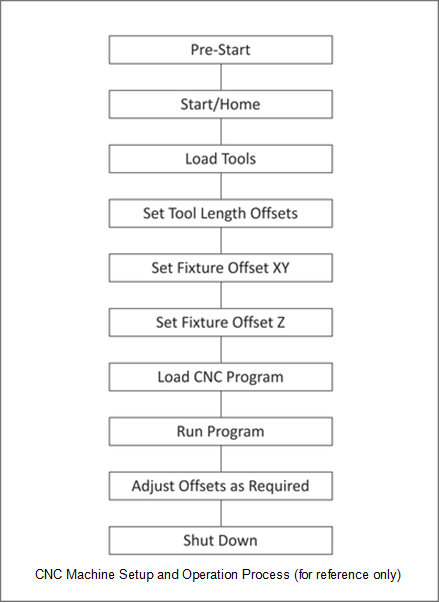
1. Pre-Start
Before starting the machine, check to ensure oil and coolant levels are full. Check the machine maintenance manual if you are unsure about how
to service it. Ensure the work area is clear of any loose tools or equipment. If the machine requires an air supply, ensure the compressor is on
and pressure meets the machine requirements.
2. Start/Home
Turn power on the machine and control. The main breaker is located at the back of the machine. The machine power button is located in the
upper-left corner on the control face.
3. Load Tools
Load tools into the tool carousel in the order listed in the CNC program tool list.
4. Set Tool Length Offsets
For each tool used, jog the machine to find and then set the TLO.
Setting tools requires manually jogging the machine with hands in the machine work envelope. Use extreme caution and observe the following
rules:
- The spindle must be off.
- Never place your hand between the tool and the 1-2-3 block.
- Ensure the correct axis and jog increment are set before jogging.
- Move the handle slowly and deliberately. Keep your eyes on your hands and the tool position at all times.
- Never allow anyone else to operate the control when your hand is in the work area.
5. Set Fixture Offset XY
Once the vise or other fixture is properly installed and aligned on the machine, set the fixture offset to locate the part XY datum.
- To shift the datum RIGHT in relation to the machine operator, ADD a shift amount to the offset X-value. For example, to shift X+.1, input .1
- WRITE/ENTER.
- To shift the datum CLOSER to the machine operator, SUBTRACT a shift amount from the offset Y-value. For example, to shift Y-.1, input -.1
- WRITE/ENTER.
6. Set Fixture Offset Z
Use a dial indicator and 1-2-3 block to find and set the fixture offset Z.
- Shift the datum DOWN by an incremental distance from the top of the part to remove stock from the top-face by subtracting the amount of
- stock to remove from the Fixture Offset Z Value.
7. Load CNC Program
Download the CNC program from your computer to the machine control using RS-232 communications, USB flash memory, or floppy disk.
- All programs must begin with the letter "O" (NOT the number zero). The program name must be an integer up to five digits long. No
- decimal point, letters, or special characters are allowed.
8. Run Program
Run the program, using extra caution until the program is proven to be error-free.
- A common error is setting the Fixture or Tool Length offset incorrectly. When running a program for the first time, set the machine to Single
- block mode. Reduce rapid feed rate to 25%, and proceed with caution. Once the tool is cutting, turn off single block mode and let the
- program run. Do not leave the machine unattended, and keep one hand on the feed hold button. Listen, watch chip formation, and be
- ready to adjust cutting feed rates to suite cutting conditions.
9. Adjust Offsets as Required
Check the part features and adjust the CDC or TLO registers as needed to ensure the part is within design specifications.
- Wear compensation is used only on contour passes. It is not used for face milling, 3D milling, or drill cycles. Select the Wear
- Compensation option in your CAD/CAM software and, if needed, set a Tool Diameter Wear value as shown above. When used, the wear
- value is always a negative number.
- Always set Tool Diameter Geometry to zero for all tools since CAD/CAM software already accounts for the tool diameter by programming
- the tool center line path.
10. Shut Down
Remove tools from the spindle, clean the work area, and properly shut down the machine. Be sure to clean the work area and leave the machine
and tools in the location and condition you found them.
- It is important to clean the machine after each use to prevent corrosion, promote a safe work environment, and as a professional courtesy
- to others. Allow at least 15-30 minutes at the end of each day for cleaning. At the very least, put away all unused tools and tooling, wash
- down the machine with coolant, remove standing coolant from the table, and run the chip conveyor.
*** Warnings
- Never operate a CNC machine or any shop equipment unless you have been properly trained on its use.
- Observe extreme caution at all times.
- Follow all safety rules.
|
 English
 French
 German

